The Best Self Leveling Concrete for a Perfectly Flat Garage
Understanding Self-Leveling vs. Traditional Concrete
When we talk about the best self leveling concrete for garage floor applications, it is important to understand that this isn’t just “thin concrete.” Traditional concrete is a thick, structural material made of Portland cement, water, and large aggregates (stones). It requires heavy manual labor—screeding, bull-floating, and power-troweling—to get it even remotely flat. Even then, traditional concrete is prone to shrinking and rarely results in a perfectly level surface.
Self-leveling concrete, often referred to as Self-Leveling Underlayment (SLU), is a highly engineered cementitious mixture. It typically contains Portland cement, but it is heavily modified with polymer plasticizers. These polymers give the material its “superpower”: flowability. Instead of being pushed into place, it flows like thick syrup, seeking the lowest points of the garage floor to create a level plane through gravity.
Key differences include:
- High Early Strength: Most self-leveling products achieve impressive strength quickly. For example, some products exceed 1,000 PSI in just 7 days and reach over 2,000 to 5,000 PSI at full cure, as noted in scientific research on self-leveling underlayment performance.
- Thickness Range: While traditional slabs are usually 4 inches thick, self-levelers are designed for thin-to-medium lifts. You can apply them from a “featheredge” (nearly zero) up to 1.5 inches in a single pour, or even up to 5 inches if you add specific aggregates.
- Self-Finishing: Because they are so fluid, they don’t require the intensive troweling that regular concrete does. They “heal” themselves as they flow, meaning bubbles and tool marks disappear before the product sets.
- Interior vs. Exterior: Most self-levelers are rated for interior use only. Since a garage is technically an “unconditioned” interior space, you must choose a product that can handle the temperature swings and moisture levels common in Georgia.
Choosing the Best Self Leveling Concrete for Garage Floor
Selecting the right product depends on the current state of your slab and what you plan to put on top of it. If you are looking for more info about flake floor systems, you need a leveler that provides a high-bond strength and a smooth surface for the epoxy to grip.
In a garage environment, we look for three non-negotiables: Industrial-grade durability, thermal shock resistance (so it doesn’t pop off when the temperature drops in January), and high-flow formulas that give us enough “wet edge” time to finish the whole floor before it hardens.
Professional-Grade vs. Consumer Best Self Leveling Concrete for Garage Floor
There is a significant gap between the bags you find at a big-box home improvement store and the professional-grade systems we use at Creative Concrete Coatings.
- Ardex K15: This is often considered the “gold standard” in the industry. It is a rapid self-leveling product that sets in 20–30 minutes and is walkable in just a few hours. According to scientific research on rapid-setting concrete levelers, it is prized for its ability to featheredge perfectly, meaning it can transition from 2 inches deep down to nothing without a visible ridge.
- Mapei Ultraplan: These products are known for their incredible flow. They are excellent for large garage floors where you need the material to travel long distances without “setting up” too fast.
- LATICRETE NXT: This system is a favorite for projects with weight concerns. Their “Lite” version is 40–50% lighter than standard concrete but maintains the strength needed for vehicle traffic.
- Rapid Set: A popular choice for both pros and advanced DIYers. It offers “high early strength,” meaning you can often walk on it in 3 hours and drive on it much sooner than traditional concrete.
The biggest difference in these products is the working time. Professional products often give you a 15–20 minute window to get the product on the floor and rolled out. If you miss that window, the product begins to “skin over,” and you’ll end up with a lumpy mess instead of a flat floor.
Key Performance Specs for the Best Self Leveling Concrete for Garage Floor
When comparing bags, don’t just look at the price. Look at the technical data sheet (TDS). Here is what we look for:
- Compressive Strength: For a garage, you want a minimum of 3,000 PSI. Premium products like Sakrete or Ardex often reach 5,000 PSI, which is stronger than the original house foundation in many cases.
- Cure Time: Look for “walkable” times of 4–6 hours. However, if you plan on applying grind and clear services or epoxy, you usually need to wait 24 hours for the moisture to leave the slab.
- Shrinkage Compensation: Cheap levelers shrink as they dry, which causes them to pull away from the edges or crack. High-quality levelers are “shrinkage-compensated” to stay dimensionally stable.
- Chemical Resistance: Since garages house cars that leak oil and coolant, the leveler must be dense enough to resist these fluids, or it must be compatible with a high-quality topcoat.

Essential Preparation and Installation Steps
If you take only one thing away from this guide, let it be this: Preparation is 90% of the job. You can buy the most expensive, best self leveling concrete for garage floor repair, but if the substrate is dirty or wet, the new floor will peel up like a giant sticker.
The first step is moisture testing. In Georgia, high humidity and high water tables can cause moisture to push up through the concrete. We use a non-destructive moisture meter (following ASTM F2659 standards) to ensure the slab is dry. If moisture levels are too high, the self-leveler will fail.
Next is surface cleaning. You must remove all “bond inhibitors.” This includes:
- Oil and grease stains
- Old paint or “Drylock” sealers
- Curing compounds
- Dust and laitance (that chalky white powder on top of old concrete)
Once clean, you must seal every single crack. Because self-leveling concrete is so fluid, it will find even the tiniest crack and leak right through it, potentially disappearing into the gravel subbase beneath your garage. We use specialized crack fillers to “dam” the perimeter and seal the floor.
Finally, you must apply a primer. Scientific research on concrete primers shows that priming does two things: it prevents the dry, old concrete from sucking the water out of the new leveler too fast, and it acts as a “glue” to ensure a permanent bond.
Step-by-Step Installation Process
Installing a self-leveling floor is a high-speed team sport. In a typical two-car garage, you need at least three people: one to mix, one to carry and pour, and one to spread and roll.
- The Mix: Use a high-torque 1/2″ drill with a paddle mixer. You must follow the water-to-powder ratio exactly. Adding too much water “drowns” the polymers and results in a weak, dusty surface.
- The Pour: Start at the furthest corner and work your way toward the garage door. Pour in continuous strips to maintain a “wet edge.”
- The Gauge Rake: A professional uses a gauge rake set to the desired thickness (e.g., 1/4 inch). This tool ensures the material is spread evenly across the floor.
- The Spiked Roller: This is the secret weapon. A spiked roller is rolled through the wet material to break the surface tension and release trapped air bubbles. This is what creates that glass-like finish.
- The Feather: Use a hand trowel to feather the edges where the leveler meets the garage door or walls.
If you are preparing for garage floor epoxy, this level surface is the perfect canvas for a high-performance coating.
Durability and Finishing: Is a Topcoat Necessary?
A common question we get in Monroe and Alpharetta is: “Can I just leave the self-leveling concrete as my final floor?”
The short answer is no. While some products are marketed as “wear surfaces,” most self-leveling compounds are somewhat porous. In a garage, vehicle tires can cause “hot tire pick-up,” where the heat from the tires literally pulls the concrete off the floor. Furthermore, road salt, oil, and gasoline will stain an unprotected leveler instantly.
To protect your investment, a topcoat is essential. Here are the best ways to finish a leveled floor:
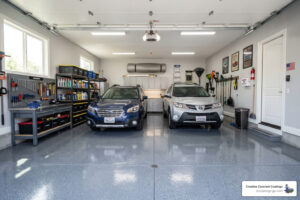
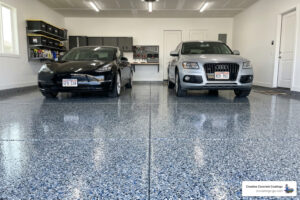
- Epoxy Flake Floors: This is our most popular option. It involves a thick layer of epoxy, a full broadcast of decorative flakes, and a durable topcoat. It hides imperfections and provides excellent slip resistance.
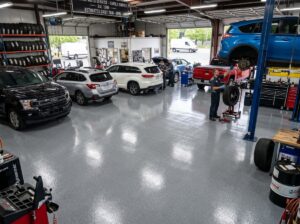
- Solid Color Industrial Coatings: For a clean, “shop” look, a solid color industrial coating provides extreme chemical resistance and is easy to sweep.
- Grind and Clear: If you like the look of raw concrete, the leveled surface can be lightly sanded and sealed with a high-UV stability clear coat.
A proper topcoat turns a flat floor into a durable “system” that can handle heavy vehicles and temperature swings for decades.

Frequently Asked Questions about Garage Floor Leveling
How long before I can drive on self-leveling concrete?
While many products are walkable in 4 hours, we recommend waiting at least 24 to 48 hours before driving a vehicle onto the floor. If you are applying an epoxy coating over the leveler, you must wait for the leveler to fully cure (usually 24 hours) before starting the coating process. Driving on it too early can cause “point loading” cracks where the tires sit.
Can I use self-leveling concrete over painted garage floors?
Generally, no. Self-leveling concrete needs to bond to the “pores” of the concrete. Paint and sealers block those pores. If you pour over paint, the leveler is only as strong as the paint’s bond to the floor—which usually isn’t very strong. We always recommend grinding off old paint or “Drylock” before applying the best self leveling concrete for garage floor products.
Does self-leveling concrete need to be sealed in a garage?
Absolutely. Without a sealer or epoxy topcoat, the leveler will absorb oil, grease, and moisture. Over time, this will lead to staining, spalling, and eventually failure of the material. Think of the self-leveler as the “foundation” and the topcoat as the “armor.”
Conclusion
Achieving a perfectly flat garage floor is a transformative home improvement project. By choosing the best self leveling concrete for garage floor needs—whether that’s the rapid speed of Ardex or the high-strength of Sakrete—you set the stage for a floor that looks better and lasts longer.
However, the margin for error with these products is slim. Between the rapid set times, the need for specialized tools like gauge rakes and spiked rollers, and the critical importance of moisture testing, many homeowners find that professional installation is the safest route.
At Creative Concrete Coatings, we bring over 25 years of experience to every job. We’ve installed over 455,000 square feet of high-performance flooring across Georgia, from Monroe and Suwanee to Alpharetta and Athens. We understand the local climate and the specific challenges of Georgia concrete.
If you’re tired of looking at a cracked, uneven garage floor and want the 1 choice for epoxy garage floor coatings in Monroe GA, we are here to help. Our 100% satisfaction guarantee ensures that your garage will be the envy of the neighborhood.
Ready to level up? Give us a call, and let’s turn that bumpy garage slab into a perfectly flat masterpiece.