Why Painting Garage Floor Concrete Is Worth Doing Right
Painting garage floor concrete is one of the most effective ways to protect your slab, eliminate concrete dust, and give your garage a clean, professional look.
Here’s a quick overview of the process:
- Clean and degrease the concrete surface thoroughly
- Test for moisture and check surface porosity
- Repair cracks and remove any efflorescence
- Etch or prime the surface for proper adhesion
- Apply paint or epoxy in thin, even coats
- Allow full cure before foot or vehicle traffic
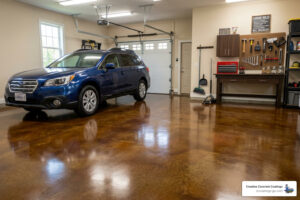
Plain concrete is porous. It absorbs oil, grease, and moisture – and it constantly sheds fine dust. A properly painted or coated floor creates a barrier that’s far easier to clean, resists common garage spills like oil and antifreeze, and holds up under heavy use. Whether you’re parking a car, running a workshop, or just tired of looking at stained concrete, the right coating makes a real difference.
That said, the results are only as good as the prep work. Skipping steps – like cleaning thoroughly or priming correctly – is the number one reason garage floor paint fails.
I’m Scott Shannon, owner of Creative Concrete Coatings and a Marine Corps veteran with decades of hands-on experience in construction and concrete coatings, including painting garage floor concrete for homeowners and businesses across Georgia. In this guide, I’ll walk you through exactly how to do it right.

Choosing the Best Materials for Painting Garage Floor Concrete
When you decide to tackle painting garage floor concrete, the first hurdle is choosing the right material. Not all “paints” are created equal, and in a garage environment—where hot tires, oil drips, and heavy toolboxes are the norm—the wrong choice will peel faster than a sunburn.
In our 25+ years of experience at Creative Concrete Coatings, we’ve seen every type of DIY application imaginable. Here is how the most common options stack up:
| Feature | Acrylic Concrete Paint | Polyurethane Paint | Epoxy Coating (1-Part or 2-Part) |
|---|---|---|---|
| Durability | Low (Best for light foot traffic) | Moderate (Good UV resistance) | High (Best for vehicles/chemicals) |
| Chemical Resistance | Minimal | Good | Excellent |
| Hot Tire Pickup | High risk of peeling | Moderate risk | Low (especially with 2-part) |
| Ease of Use | Very Easy (Water-based) | Moderate | Advanced (Requires mixing) |
Epoxy Resin: The Heavyweight Champion
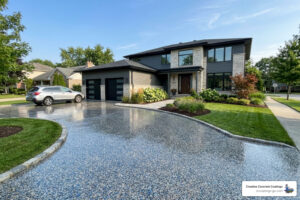
Epoxy isn’t technically “paint”; it’s a thermosetting resin that creates a chemical bond with the concrete. For high-traffic garages in Monroe or Lawrenceville, a two-part epoxy is the gold standard. It offers superior resistance to “hot tire pickup”—that annoying phenomenon where warm tires bond to the paint and pull it off the floor when you pull out of the driveway. If you want a more decorative look, you can explore flake floor systems which add texture and color depth to the epoxy base.
Polyurethane and Acrylic
Acrylic is easy to apply, but it’s thin. It’s great for a basement storage room, but it won’t survive a Georgia summer in a garage. Polyurethane is often used as a topcoat because it is highly UV-stable, meaning it won’t yellow when the sun hits your garage threshold.
The Secret Ingredient: Bonding Primers
Regardless of the topcoat, primer is crucial for helping paint bond to the concrete. Concrete is naturally alkaline and porous; a dedicated bonding primer penetrates those pores and creates a “bridge” for the paint to grab onto. Skipping this step is the fastest way to end up with a flaking floor.
Essential Preparation for Painting Garage Floor Concrete
If you remember one thing from this guide, let it be this: 90% of a successful floor coating is the preparation. You can buy high-quality epoxy, but if you put it over a dirty or damp floor, it will fail.

The Moisture Test
Before you even buy your supplies, you need to know if your concrete is “breathing” too much moisture. Take a 2×2 foot piece of plastic sheeting and tape it airtight to your garage floor. Wait 24 hours. If you see condensation under the plastic or the concrete looks darker, your concrete is too damp to paint. Painting over moisture traps the vapor, which will eventually bubble and blow the paint right off the surface.
Checking Surface Porosity
Concrete needs to be “thirsty” to accept paint. Perform a water drop test: drip some water on various spots. If it soaks in quickly, you’re in good shape. If it beads up like water on a waxed car, the surface may be too smooth or has an existing sealer that must be removed.
Step 1: Cleaning and Painting Garage Floor Concrete Prep
Start by clearing everything out. Yes, everything. Then, use a heavy-duty degreaser or a TSP (trisodium phosphate) solution to scrub away oil and grease. Oil is the enemy of adhesion.
You should also look for efflorescence—a powdery white substance that often appears on concrete. This is salt being pushed out by moisture. Brush it off and clean the area with diluted vinegar to neutralize it.
Safety Note: If your garage was built before 1978 and has been painted before, be aware of lead dust. Always follow EPA lead safety guidelines when scraping or sanding old surfaces.
Etching and Priming the Surface
Once the floor is clean, it’s time to “open” the pores. Most DIYers use a muriatic acid solution (etching). This creates a texture similar to fine-grit sandpaper. However, at Creative Concrete Coatings, we prefer mechanical grinding. Grinding is cleaner, safer, and provides a much better mechanical bond for the coating.
After etching or grinding, ensure the floor is bone dry. Then, apply your bonding primer. Using a tinted primer that matches your final color can help you achieve better coverage with fewer topcoats. For those who want the best results without the weekend-long headache, we offer expert one-day garage coating services in Monroe and surrounding areas that handle all this heavy prep for you.
The Step-by-Step Application Process
Now for the fun part: the actual painting garage floor concrete.
- Tape the Edges: Use high-quality painter’s tape to protect your baseboards or the bottom of your drywall.
- Cut In: Use a brush to paint a 2-3 inch border around the entire perimeter of the garage and around any permanent fixtures.
- The Main Floor: Use a 3/8-inch nap roller with an extension pole. This will save your back and ensure even pressure.
- Work in Sections: Start at the back corner furthest from the door. Work in small sections (about 4×4 feet), using long, overlapping strokes.
- Apply Thin Coats: Two thin coats are always better than one thick, gloppy coat. Thick paint takes forever to cure and is prone to peeling.
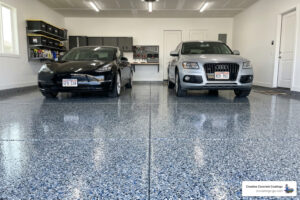
- Add Elements: If you want a decorative look, toss your flakes upward toward the ceiling so they rain down evenly. You can view our color gallery to see how different flake combinations look in real Georgia garages.
- Anti-Slip: If your garage gets wet frequently, stir in an anti-slip additive to your final coat to prevent the floor from becoming a skating rink.
Common Mistakes When Painting Garage Floor Concrete
Even with the best intentions, things can go wrong. Here are the “big four” mistakes we see in Johns Creek and Suwanee:
- High Humidity: If the humidity is over 70%, the paint won’t dry correctly. It might stay tacky for days.
- Trapped Moisture: Failing the moisture test mentioned above.
- Skipping Primer: Thinking the paint is “self-priming.” (In a garage, it usually isn’t).
- Premature Traffic: Driving your car on the floor too soon. Even if it feels dry to the touch, it hasn’t reached full chemical hardness.
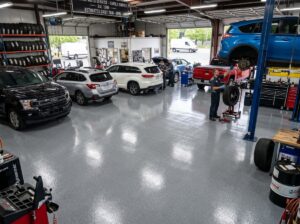
If you’re worried about these pitfalls, it’s often worth asking who installs heavy-traffic epoxy floors professionally to ensure a lifetime of durability.
Drying, Curing, and Long-Term Maintenance
Patience is a virtue, especially when painting garage floor concrete.
- Foot Traffic: Usually safe after 24 to 48 hours.
- Heavy Items: Wait at least 72 hours before moving back your heavy toolboxes or refrigerators.
- Vehicles: Do not park your car on the new floor for at least 7 days. The weight and heat of the tires can ruin a fresh cure.
Keeping it Clean
Once cured, your new floor is incredibly easy to maintain. Forget the heavy scrubbing. Most of the time, a simple sweep and a mop with warm water and a mild, non-abrasive soap (like Dawn) will keep it looking brand new. Avoid harsh cleaners with bleach or citrus, as they can dull the shine over time. If you have more questions about long-term care, check out our frequently asked questions about coatings.
Frequently Asked Questions
Can you paint over an existing sealer?
Generally, no. Most paints and epoxies will not bond to an existing sealer. You will need to mechanically grind the floor or use a specialized chemical stripper to get back to bare concrete before applying a new coating.
How much paint is needed for a standard garage?
A standard one-car garage is about 200–250 square feet, while a two-car garage is roughly 400–500 square feet. Most garage floor paints cover about 300–400 square feet per gallon. Factor in two coats plus a primer, and you’ll typically need 2–3 gallons of paint for a two-car garage.
Why is my garage floor paint peeling?
The most common culprits are moisture in the slab, oil/grease residue that wasn’t fully cleaned, or a lack of proper etching/grinding. If the concrete was too smooth, the paint had nothing to “bite” into.
Conclusion
Painting garage floor concrete is a rewarding DIY project that can completely transform your home’s most hard-working space. However, it requires precision, the right tools, and a lot of elbow grease.
At Creative Concrete Coatings, we’ve spent over a quarter-century perfecting the art of the “one-day floor.” Based in Monroe, GA, we serve neighbors in Athens, Buford, Loganville, and across the region. Whether you want a simple solid color industrial look or a sleek grind and clear finish, we bring the professional equipment and experience to ensure your floor never gives you the blues.
Ready to skip the DIY stress? Transform your garage today with a professional coating that’s built to last.