A Quick Answer: The Best Way to Epoxy a Garage Floor
The best way to epoxy a garage floor comes down to five core steps done in the right order:
- Prepare the surface – grind or acid etch the concrete to create a rough profile for bonding
- Test for moisture and sealers – high moisture or existing sealers will cause epoxy to fail
- Repair cracks and imperfections – fill holes and cracks before any coating goes down
- Apply primer, base coat, and topcoat – use a 100% solids epoxy system for best durability
- Allow full cure time – 24 hours before foot traffic, 72 hours before parking vehicles
Skip any of these steps and you risk peeling, bubbling, or a floor that fails within months.
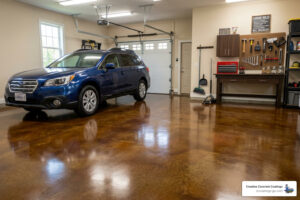
A worn, stained garage floor is one of the most common frustrations for Georgia homeowners. It’s an eyesore, it’s hard to clean, and bare concrete just wasn’t built to hold up against hot tires, oil spills, and daily foot traffic over the long haul.
That’s exactly why epoxy garage floors have become the go-to upgrade for homeowners who want a surface that looks sharp and actually lasts. Done right, an epoxy floor can hold up for 10 to 20 years — but the difference between a floor that lasts and one that peels up in a year comes down almost entirely to how it’s applied.
This guide walks you through the entire process — from testing your concrete to laying down the final topcoat — so you can get professional results whether you’re tackling it yourself or knowing what to expect when hiring a pro.

Why Epoxy is the Best Way to Epoxy Garage Floor
When we talk about the best way to epoxy garage floor surfaces, we aren’t just talking about a fresh coat of paint. Epoxy is a different beast entirely. It is a resinous flooring system created by a chemical reaction between two parts: a resin and a hardener. When mixed, they form a rigid plastic-like material that bonds incredibly well to properly prepared concrete.
In our 25+ years of experience across Monroe, Loganville, and Athens, we’ve seen how epoxy transforms a workspace. Unlike standard floor paint that just sits on top of the concrete, epoxy becomes part of it. This creates a seamless, non-porous surface that is virtually indestructible under normal garage conditions.

Choosing the Best Way to Epoxy Garage Floor Materials
Not all epoxy is created equal. If you walk into a big-box store in Alpharetta or Buford, you’ll likely see water-based kits. While these are DIY-friendly because they have a longer “pot life” (the time you have to work with the product before it hardens), they are often only 40% to 60% solids. This means that as the floor dries, the water or solvent evaporates, leaving a much thinner layer behind.
For the best way to epoxy garage floor results, we recommend a 100% solids epoxy system.
| Epoxy Type | Thickness (Mils) | Durability | Best Use |
|---|---|---|---|
| Water-Based | 2 – 4 mils | Low | Light foot traffic |
| Solvent-Based | 3 – 6 mils | Medium | Residential garages (moderate use) |
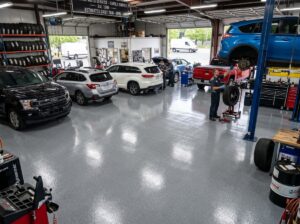
| 100% Solids | 10 – 20+ mils | High | Professional shops, high-traffic garages |
A high-build system, like the ones we install, can reach 18-22 mils of thickness. That is nearly six times thicker than standard national brand kits! This extra “meat” on the floor is what allows it to survive dropped tools and heavy SUVs without chipping.
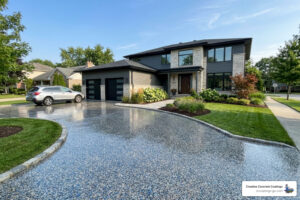
Furthermore, we often discuss the importance of Epoxy Resins Safety and UV stability. Most standard epoxies will “amber” or yellow if exposed to direct sunlight. This is why we often use a polyaspartic topcoat for areas near garage doors or windows, as it provides superior UV protection and even better scratch resistance.
Benefits and Potential Disadvantages
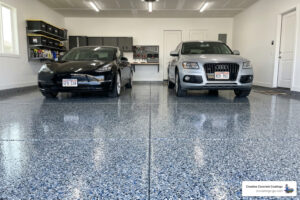
The benefits of a professional-grade flake floor are hard to beat. You get incredible stain resistance—motor oil, gasoline, and even bleach can be wiped right up. It also provides impact protection; if you drop a heavy wrench in your Johns Creek workshop, the epoxy acts as a shock absorber for the concrete underneath.
However, there are a few things to consider. Epoxy can be quite slippery when wet, which is why we always recommend an anti-skid additive. It is also preparation-intensive. You can’t just “slap it on.” If you have a high-traffic area that doesn’t need the decorative look of flakes, you might consider a solid color industrial coating for a more utilitarian, heavy-duty finish.
Surface Preparation: Testing and Profiling Concrete
If there is one thing we want you to take away from this guide, it’s this: Preparation is 90% of the job. We have installed over 455,000 square feet of coatings, and the number one reason for floor failure is poor surface prep.
To get the best way to epoxy garage floor results, the concrete must be “open.” Imagine concrete like a giant sponge with millions of tiny pores. Over time, those pores get clogged with dirt, oil, and sealers. If you don’t open them back up, the epoxy has nothing to grab onto.
Testing for Moisture and Sealers
Before you even think about buying materials, you need to perform two critical tests.
- The Water Bead Test: Sprinkle water on various parts of your garage floor. If the water beads up, there is an existing sealer or oil residue present. If it soaks in and turns the concrete dark, you’re in better shape. However, even if it soaks in, we still recommend a grind and clear approach or full mechanical profiling to ensure a perfect bond.
- The Moisture Test (ASTM D4263): Tape a 2’x2′ piece of heavy plastic to the floor, sealing all edges with duct tape. Wait 24 hours. If there is condensation under the plastic or the concrete is darker, you have a moisture issue. Moisture vapor transmission must be below 6 lbs per 1,000 sq ft over 24 hours for most epoxies to stick. If your garage in Suwanee or Hoschton is below grade, this step is non-negotiable.
Repairing Cracks and Assessing Suitability
Your floor needs to be structurally sound. New concrete must cure for at least 30 days before you can apply epoxy. If you apply it too soon, the moisture escaping the concrete will blow the coating right off the surface.
For existing floors, you’ll likely find cracks or “pitting.” We use specialized epoxy fillers to bridge these gaps. Don’t use standard hardware store caulk; it won’t bond with the epoxy and will show through the final finish. When it comes to control joints (the deep lines cut into your slab), we generally recommend leaving them open or filling them with a flexible sealant after coating to allow the concrete to move naturally without cracking your new floor. Check out our FAQs for more details on handling specific floor defects.
The gold standard for prep is diamond grinding. While acid etching (using a muriatic acid solution) is a common DIY method, it often doesn’t go deep enough and can leave behind salts that interfere with adhesion. Diamond grinding creates a Concrete Surface Profile (CSP) of 2, which feels like medium-grit sandpaper. This is the best way to epoxy garage floor surfaces for long-term success.
Step-by-Step Application Guide
Once the floor is ground, vacuumed (multiple times!), and dry, it’s time for the “glory” steps. But first, check your environment. The ideal temperature for application is between 50°F and 90°F, with humidity below 85%. If it’s a humid Georgia summer day in Lawrenceville, you might want to wait for a cooler morning.
Mastering the Best Way to Epoxy Garage Floor Application
Tools You’ll Need:
- A notched squeegee (to spread the epoxy evenly)
- High-quality 3/8″ nap rollers (pre-treated to remove loose lint)
- Spiked shoes (so you can walk on the wet epoxy to broadcast flakes)
- A drill with a mixing paddle
- Proper PPE: Gloves, safety glasses, and a respirator if using solvent-based products
The Mixing Process: Epoxy is a chemical reaction. You usually have a Part A (Resin) and a Part B (Hardener).
- Stir Part A first to ensure pigments are distributed.
- Add Part B and mix for a full 3 minutes. Don’t just swirl it; scrape the sides and the bottom of the bucket.
- Note the Pot Life: Most 100% solids epoxies have a working time of about 30 to 45 minutes. Once it starts getting warm in the bucket, it’s going to harden fast!
Application Technique: Start by “cutting in” the edges with a brush. Then, pour the epoxy onto the floor in a long “ribbon.” Use your squeegee to pull the material across the floor, then “back-roll” with your roller to level it out. This ensures you achieve that professional 18-22 mils thickness. Always maintain a “wet edge”—never let one section dry before you start the next, or you’ll see a visible seam.
Broadcasting Decorative Flakes and Additives
If you’re going for a flake floor, timing is everything. You must broadcast the flakes while the base coat is still wet.
The best way to epoxy garage floor flakes is to throw them upward—think of it like tossing “fairy dust.” This allows the flakes to flutter down and distribute evenly, rather than clump together in one spot. We usually recommend a “full broadcast,” meaning you throw flakes until the floor can’t take any more and no wet spots are visible. This provides the best durability and hides imperfections in the concrete.
Finally, don’t forget the anti-skid grit. We often use aluminum oxide or fine sand mixed into the clear topcoat to ensure the floor isn’t like an ice rink when you walk in with wet shoes after a rainstorm in Watkinsville.
Curing and Maintenance
One of the hardest parts of the job is waiting. We know you want to get your cars back into your Dacula garage, but rushing the cure is a recipe for “hot tire pick-up,” where your tires literally pull the epoxy off the floor.
The Waiting Game:
- Foot Traffic: Wait at least 24 hours.
- Heavy Items/Furniture: Wait 48 hours.
- Vehicles: Wait a full 72 hours (3 days). In cooler weather, we recommend waiting up to 7 days for a full chemical cure.
Explore our colors to see how different flake blends can hide dirt and sawdust, making your maintenance even easier.
Cleaning and Long-Term Care
Maintaining your new floor is surprisingly easy. For daily dust, a simple microfiber dust mop or a leaf blower works wonders. For a deeper clean, use a pH-neutral cleaner. A mixture of 1/2 cup of ammonia per gallon of water is a classic, effective, and cheap way to keep the shine alive without leaving a film.
Avoid using acidic cleaners (like vinegar) or citrus-based cleaners, as these can dull the finish over time. If you do spill something like brake fluid or battery acid, wipe it up promptly. While the floor is resistant, leaving harsh chemicals to sit for days isn’t good for any surface.
Common Mistakes to Avoid
In our 25 years of serving the Monroe GA area, we’ve seen every mistake in the book. Here are the big ones to avoid:
- Inadequate Prep: We can’t say it enough. If you don’t grind or etch, it will peel.
- Improper Mixing: If you don’t mix Part A and B thoroughly, you’ll end up with “tacky” spots that never harden.
- Ignoring Humidity: High humidity can cause a “blush” or a cloudy film on the topcoat.
- Applying Too Thin: If you try to stretch one kit to cover a 3-car garage, the finish will be uneven and won’t last.
Conclusion
The best way to epoxy garage floor surfaces is a journey of patience and precision. While the DIY route is possible for a patient homeowner, achieving a truly professional, “bulletproof” finish requires specialized equipment and high-solids materials that aren’t usually found on a retail shelf.
At Creative Concrete Coatings, we take the stress out of the process. Based in Monroe, GA, we bring over two decades of expertise to every project, ensuring that your floor isn’t just a weekend project, but a long-term investment. Whether you are in Braselton, Alpharetta, or right here in Monroe, we are The #1 Choice for Epoxy Garage Floor Coatings in Monroe, GA.
Ready to transform your garage into a showroom? We’ve installed over 455k square feet of beautiful, durable coatings with a 100% satisfaction guarantee.
Frequently Asked Questions
Can I epoxy over existing paint or coatings? Generally, no. Epoxy needs to bond to the concrete itself. If you apply it over old paint, the epoxy is only as strong as that old paint’s bond. Most likely, the epoxy will pull the old paint right off the floor. The best way to handle this is to grind the old coating off completely before starting.
What is the ideal temperature and humidity for application? For the best results, aim for a temperature between 50°F and 90°F. If it’s too cold, the epoxy won’t cure; if it’s too hot, it will harden before you can finish rolling it out. Humidity should ideally be below 85% to prevent moisture from interfering with the chemical reaction.
How do I handle cracks and control joints before coating? Cracks should be cleaned out and filled with a rigid epoxy filler. For control joints (the lines cut by the builder), we recommend leaving them as-is and coating into them. If you fill them with a rigid material, the concrete’s natural movement will eventually cause a new crack to form right next to the joint. If you want a perfectly seamless look, use a specialized flexible joint filler designed for use with resinous floors.